Build your own
How to build a Drop Trap
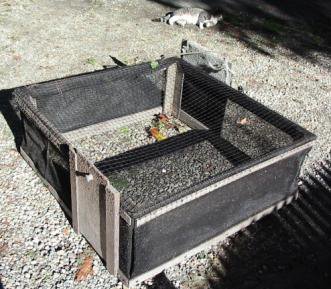
This is a non-folding, homemade drop trap (2 different netting options). It requires basic woodworking skills, some handiness, and tools (drill, circular saw) to make. Folding traps are heavier (19 pounds versus 12 pounds, and also less weatherproof - this means you can't leave them in place for several days, when you have the misfortune to meet the rare cat who won't come near it). Folding traps take more advanced woodworking skills to make, so I don't provide instructions, but you can download detailed photo's and a supplier list, and I'm happy to answer questions (hubcatsboston@aol.com).
How it works A wooden frame, covered by netting or mesh is propped up on one side. Food is placed in the center-back. The trapper stands at a distance, and when the cats are inside, pulls on the string attached to the prop-stick, allowing the trap to drop, capturing the cats. The drop trap is then covered with a blanket, and a box trap is placed in front of the door. The box trap is covered (top and sides only) to make it appear to be a tunnel/exit, and the matching guillotine-style doors are opened. Each cat is securely transferred to a box trap, for transport to the vet.
Design and construction Dimensions are 3’Wx3’Dx14”H. The prop stick is 14-16” long. These dimensions work well. I just discovered that the folding trap is 36" wide but 32" front to back, never missed those four inches.
A smaller trap might work with a shorter prop stick (cats back up fast when trap starts to drop, so trap must be down by the time they reach the front of it).
The frame is constructed of “strapping” for light weight and rounded edges. This trap is built to be light rather than sturdy.
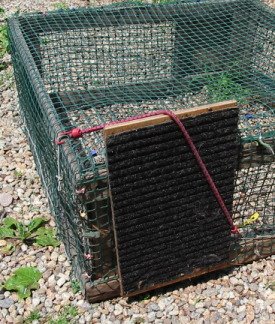
There’s a ¾” plywood hinged flap (carpeted for traction) attached to the back on which is placed an anchor weight (a bucket of bricks) – this allows the trap itself to be light enough not to crush a cat or kitten, to be carried easily, and also stabilizes and anchors the trap.
The door is constructed of ¼” sanded underlayment plywood, 7”Wx18”H, and the slides for it are straight-grained fir tongue-and-groove flooring, ripped in half.
Directions:1) cut 8 pieces of "strapping" (1x3's with rounded edges) 3 feet long.
2) cut 5 pieces 14" long.
3) rip a 32” piece of 3” tongue and groove fir flooring in half. cut the “groove” side in half.
(these are door slides)
4) cut a piece of 1/8" or 1/4" plywood for a door (shd be opaque), around 7" x 16"
5) cut a piece of 3/4" plywood, around 10" x 18" (anchor flap) - you can use 1/2" ply if you will paint or varnish it.
6) construct two rectangles out of 2 long, 2 short pieces of strapping, these are the front and back frames. Use 5/8" or 1" drywall screws, as appropriate.
Attach them together with the remaining long pieces, so that you have a frame about 3 feet square.
7) sand the frame really well - watch out for screws poking through, splinters, rough surfaces.
8) cover frame with netting. Don't use staples! lash the netting in one piece neatly to the frame with nylon string or rope. You'll need about 6' x 6'. I like athletic (golf cage) netting best, altho you can use deer netting, or any kind of plastic fencing (but line with deer netting, for strength). You want a barrier that is strong, VISIBLE to the panicked cat, and relatively soft - ie, NOT chickenwire or hardware cloth.
If you use athletic netting, you can use 3/8" dowels threaded through to speed assembly (lash the dowels to the frame).
9) Assemble door and slides, and fasten near a corner of the frame. line up one slide with the corner vertical. At this point you should cut the netting in a T shape - up the center of where the door opening will be. You'll need to wrap the cut netting around the frame and secure the netting some how, or other. You can use staples as long as the cat won't be able to get at them.
A 14" piece of strapping placed behind the outer door slide (the side away from the corner can be used to wrap that side of the netting.)
You can use two 2" screws per slide - one through the top of the frame, and one through the bottom.
10) Cut a piece of carpet and glue to bottom of anchor flap. Use T-strap hinges (light duty) to fasten the anchor flap to the opposite side and corner (from the door) of the frame. Watch that screws don't come through!
11) install a cabinet knob on the door.
12) Cut a paddle for string out of 1/4" plywood. Use scrap fir flooring for prop stick (15").
13) Give yourself about 60 feet of mason's line (as heavy as possible - the fluorescent stuff stretches like mad when wet - an undesirable characteristic).
Cover material
The cover should be VISIBLE to create a visual barrier. This prevents the cat from putting everything he has into getting through. Ideally it should also be soft to bang into, and very strong.
The best material with all these attributes, is athletic netting, with a one inch mesh. We buy it online. It's also the most expensive, naturally, but you can often buy the exact size you need (about 6' x 6'). It's more difficult to work with than the rigid materials. We buy it cut to size from Gourock.com - #12 thread, 1" diamond mesh. It costs around $15.
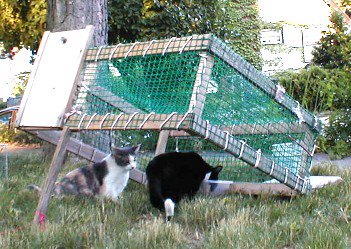
Next best is the green landscape fencing sold at home stores (see pic on left, above). I used a trap for a long time with this netting before a cat got through it. You can double this with a layer of "deer netting", also sold in home stores. This is a very strong polyethilene netting, but it has the fault of being almost invisible. Combining the two covers all the bases.
The photo top left has deer netting on top, and "debris netting" (from a construction materials place) which is a non-rippable knitted product. The debris netting is very strong, and soft to bang into - but I thought the cats felt too safe inside and I couldn't poke them with a stick to get them to leave because the mesh is so fine. I replaced the top panel with deer netting so they'd feel more exposed and I could poke them if I needed to. Combining the two materials made the trap heavy.
Orange 'safety fencing' is NOT strong enough on its own, but can be combined with a layer of deer netting. Just cable-tie the two layers together.
Prop stick
Make a prop stick out of 14-16" of the unused half of tongue-and-groove fir flooring (used for making the door slides), and round the bottom end so it won't jam when pulled, and L-notch the top end. Cut out a paddle (to hold the string) from the 1/4" sanded plywood (for lightness).
String PaddleThe paddle looks like a ping-pong paddle with a waist - it has a spool shape, with a handle. It's cut out of 1/4" plywood, well sanded, for lightness. The cord is from Home Depot, 75 feet - not fluorescent mason's line - it's too stretchy when wet.
Fastening the coverThe cover should NOT be stapled onto the frame (staples will rust, and might break the netting under impact). Staples on the inside (where the cat is) can hurt the cat, catch claws, but mostly, they just don’t hold). Before the door or flap have been mounted, cover the frame with a big piece of netting (or two pieces), and cut away the extra at the corners (leave enough material to overlap 3"), and cable tie to itself at the corners or where you have to join pieces. Leave it long enough at the bottom to overlap the frame. The netting is only fixed to the frame at the door, and around the bottom – otherwise, it’s left to move as needed. This allows the cover to give a little bit because it's loose over the frame. This is easier on the cat, and on the trap.
Fasten the door and slides (I usually put a second vertical piece of strapping behind the vertical door slide to wrap the netting around).
Then, lash the cover to the frame at the bottom rim of the trap, with rope. Using rope has the added benefit of padding the frame, so that when you are trapping on a wooden deck, the trap comes down softly, rather than with a big BANG.
 Anchor FlapThe anchor flap plays an important role. The RIGID weighted flap allows the frame to be very light, so as not to crush a cat or kitten if it falls on them - while preventing the trap from being lifted or moved very far by an angry tomcat. The weighted flap increases the footprint of the trap, and gives it stability when propped - which helps especially when trapping on a breezy day. should be finished 1/2" or 3/4 plywood (17"H x10"W) with a piece of carpet on the bottom for traction. Mount the carpet on the plywood first, and then mount to the frame with two T-hinges.

Placement of the door and anchor flap
The door was originally offset to one side to simplify the cover, which was originally in several pieces, each fastened to the frame. It happens that having the anchor flap on the opposite corner from the door does a good job of balancing the trap’s weight. When it has a cat or cats inside, jumping around and pushing UP on it, if you station yourself at the door and put your knee down on the frame, the anchor weight will hold down the opposite - farthest - corner, and the cat will be secure. If door and flap were centered, I’m not sure this would be the case. Since you will be standing at the door, having the door at the corner also gives you easy access to two sides of the trap.
TransportThe drop trap is lightweight - but fairly large and bulky. Several people in the Boston area have constructed versions of this trap that come apart for transport, or, you can carry the drop trap on an inexpensive set of roof racks. If you’re planning to put the trap in your wagon or minivan, remember you’ll also need room in the car for box traps.
Folding drop trap
I have developed a folding version of the drop trap for easier portability ($125+$25 shipping). Email HubCatsBoston@aol.com for more information, or to order. Folding traps take more advanced woodworking skills to make, so I don't provide instructions, but you can download a bundle of detailed photo's, and I'm happy to answer questions (hubcatsboston@aol.com).

2 comments:
I've been doing TNR for 30+ years and just got turned-on-to the drop trap. LOVE THE IDEA!!! gonna try to make one this week.
Love the weigh-it-down solution of a bucket. One suggestion: if you are trapping at a location that has a good source of water, I would think you could use an empty bucket (with lid so nothing drowns)or gallon jugs, and then add water. Less weight to tote around.
Keep up the good work.
Thanks for the Great Idea!
You definitely could. You can almost always find something onsite to serve as your anchor weight - a rock, a garden gnome, a patio block. You can almost always find a prop stick, also. In a pinch you can use a couple of towels to cover the trap with, however, there's no substitute for having the string with you, so, don't forget that!
Post a Comment